Thursday, April 29, 2010

Mavic SSC No 4 Cr.D Rims

I would much rather be posting about my successful un-brazing of the seat tube from the bottom bracket. But unfortunately that particular operation did not come off at all as I expected. I got everything very evenly heated, but no dice—it didn't move! So I chopped out the tube, and now it's time to ream it out from the inside! Uggh.

In better news, the rims I recently ordered for Bike #3 (counting from Niles) arrived today from France. They are New Old Stock Mavic SSC No. 4 Cr.Ds from the early 1990s. I could find no information about them online. Having now seen them in the flesh, I think I get how they differ from the legendary Paris-Roubaix SSC rims.

They look exactly like the P-R rims. Unlike the Argent and Bleu SSCs, which are, as their names suggest, respectively silver and blue, the P-Rs are hard anodized and black. The No. 4 Cr.D look like they're hard anodized... but they're not! They are in fact just silver rims that have been painted black—presumably to make them look like the P-Rs. Jobst Brandt would be so pleased!

They are thus pretty much perfect rims. The best, "mountain"-era Mavic decals; the painted-on SSC Mavic logo; double eyelets; incredibly light; incredibly strong; non-hard-anodized; and exactly resembling the coolest rims of all time, the P-R SSCs. Now I just need to visit Mike Barry and pick up some Challenge Paris-Roubaix 27mm tubulars. And build the bike, of course...

The inside of the rim is silver, not black, as are the sidewalls. Not hard-anodized! (I wonder what "Cr.D" stands for. Couche dûre is French for "hard anodized." That lower-case "r" seems to indicate the opposite!)

The incredible painted-on SSC Mavic logo.

Saturday, April 24, 2010

Fixed Top Tube, Seat Tube to Bottom Bracket

In a brazen display of bravado, I decided today to braze my first silver joint in two years—the very important seat tube/bottom bracket—without having first practiced. Such was my confidence in my brazing ("brazen'") skills. Alas, it didn't turn out all that well. But first, the top tube miter.


My TT/ST miter was off my precisely this much. I marked the TubeNotcher+ cutout (note to fellow users of this program, always add about 0.2mm to the tube diameter to make up for the width of the paper—I used 25.6 rather than 25.4 for this 1" TT and it worked well), roughed it in to that outline, and then did a visual inspection for light gaps.


It now more or less fits. There are tiny gaps, and pressing gently on any of the tube is sufficient to change the appearance of things dramatically, but I think it's now absolutely within the margin of error. (Remember Richard Sachs's motto: Imperfection is Perfection!)


The above lug is now very impatient to be brazed.

Speaking of impatience and brazing: here is my effort to braze my seat tube to the bottom bracket. (I asked Olivier to help me out rather than photograph things, so there are no pictures of the process.)


Let's begin with the good stuff. That shoreline is pretty nice! The little blob of silver on the tube and the shell will be very easy to file/sand away.


The shoreline is nice and the penetration is excellent here at the front side of the socket. (The little blob is a leftover from the tack; similarly easy to file off).

But now the bad stuff:


No matter how I tried, I couldn't draw the silver down between the chainstay sockets. Three quarters of the way around, the penetration is exemplary. But at the back here, not so. I did add a lot of silver, so it must be almost up to that lip—but it sure would be nice to know for sure. This is an important spot to get right—this page from Little Fish Bicycles immediately sprang to mind. I'm pretty much sure the penetration is sufficient. But that "pretty much" is certainly on my mind...


In this picture of the fluxed joint pre-brazing, you can see that not a lot of flux appears to have made it through to the "affected area." It was certainly clean. And I think it had the proper sloppy fit. So likely a flux issue...

Quoi faire?!

Update: The answer to the above question is, take it apart and see what happened! Doug thinks likely the only problem was that the very bottom of the tube got cooked, and that I didn't put flux there so I couldn't get the silver to flow out. But I may as well take it apart and see for myself... Should be fun!

Dropouts to Chainstay

Yesterday saw the completion of the first actual joint on the bike I am working on (codenamed Adam Jr.) I attached the dropouts to the chainstays.

Most people "slot" dropouts, but the way I learned it from Doug Fattic was just to plop them on top the the un-slotted stay and fill the gap with brass, then make a fillet above the stay to later file into a nice scallop. I don't see any downsides to this method.

There are upsides, though. For instance, it's incredible easy to "jig," and the jigging is foolproof. First, you take any old axle, space the bolts at the desired width (in my case 130mm, measured with calipers to the nearest 0.1mm), and then make sure they're in line by doing a "four point check" (i.e., treating the dropouts on the axle like the legs of a chair, and making sure all the tabs hit a flat surface together, without wobbling)—and then tightening like mad.

Then you put the bottom bracket in the vise, the chainstays in the bottom bracket, and lay the tabs of the dropouts in the chainstays. You can see this going on (and the gleaming filled-in Ritchey logo) in the photo up top, which is quite beautiful and was taken by Olivier.


That's me working on the more awkward inside face of the dropout, seen through the shop window, and also beautifully captured by Olivier!


And that's what it looked like when I was done. This is the inside of the drive side dropout, where you need extra clearance for the small cog on the cassette. It's pretty easy to offset the dropout with the "Fattic method": you just make sure the dropout tab is all the way to one side in the chainstay before brazing.


Above you can see how the chainstay is offset. You can also see that once I've filed things up, there will be (actually, already is; this photo is a bit deceptive) plenty of clearance for the 13-tooth cog in that freewheel (which is not, alas, the exact one I'll be using—though similar).

It wasn't all great news yesterday! I needed a "mitered top tube" to finish setting up the v-blocks on the Fattic design fixture. This I did, but unfortunately with the properly adjusted v-blocks, I discovered that my top tube miters were a bit off. I actually left my ST angle at 72.67 degrees just in case I screwed up the miter a bit; and since I did, I can now do a 73 degree miter a few milimeters in, and all should be well. I like 73 parallel anyway!

So I'm off to the shop to re-do that miter, file the dropout attachment, and also hopefully braze the seat tube to the bottom bracket. Yikes!

Another postscript: Without realizing what I was doing, I spelt "miter" in the American way in this post. I'll take it as a lesson: stick to your roots. "Miter" it shall be from henceforth, as a reminder of Doug Fattic and Niles, Michigan.

Thursday, April 22, 2010

Mitres

To all appearances, the mitres for my bike are now complete. I brought the camera in to the shop today, and here is what I did.

To make sure that the top tube mitres were indeed right, I needed to have all the tubes in place. This meant mitring the down tube at the bottom bracket, to let the seat tube in. I did this by inserting the ST into the BB and tracing lines with a Sharpie. (This also gives you a much better look at the carving I did for the BB.)


With the lines drawn on, the tube—whose "REYNOLDS 531" marking you can see if you squint—now looked like this:


First I took my biggest file, which produces a round shape with a 1 3/8" radius, equal to the inside of the BB shell. This left things looking like this:


That last outline corresponds to the place where the down tube meets the seat tube in the BB shell. I filed that out (with a smaller file whose shape corresponded to 28.6mm), and then stuck the tube in the BB shell to check if things fit. And they did, though I did very slightly mess up the back of the DT/BB joint. About a milimeter too much material taken off, so I won't worry. The fit was thus:


And thus:


Then I returned to the fixture to try to stick all the tubes in place. The ST and HT still interfere a bit in the BB, but I'll take care of this once the ST is brazed to the BB. Here's how things look:


With all the tubes in place, everything mercifully fit together. Here's a poor photo of the fixture with all the tubes in place. (I had to hang off the wall even to get this bad shot; I need a wide-angle lens!)


The down tube/head tube mitre:


The top tube/head tube mitre:


And the seat lug, holding things in place. (I am very sure that, beneath this lug, the mitre is where it ought to be!)


Since I was on a mitring roll, I decided to try mitring the chainring bolt I intend to use as a braze-on to mount a taillight on the seat tube. Its diameter is 10mm, the tube is 28.6, and the angle 62.67. I pushed my mitring system to the logical limit and printed off a TubeNotcher+ mitre.


It was extremely hard to hold the little guy in the vise securely enough to get a good grip, but eventually the mitre was more or less made. Olivier's little clamps seem like they'll work to keep it in place for tacking. I'll need to file off that chrome plating first, though...


The next step: brazing the seat tube to the bottom bracket!

Postscript: Reader johnb very helpfully pointed out that I was using the American spelling, "miter," in the first version of this post. No doubt this is because I learned to build bikes in Niles, Michigan. In deference to my generally European leanings—and with no disrespect whatsoever to Niles or to Michigan—I have altered this.

His comment led me to look up the origin of the word "mitre"/"miter." The main sense of the noun in the Oxford English Dictionary refers to a hat, specifically the ornate headdress of a bishop. The second sense, "A usually right-angled joint in wood or other material in which the angle made by the joined pieces is bisected by the line or plane of junction," apparently derives from the first. According to the editors of the OED, "the early form of the episcopal mitre [...] had a vertical band bisecting the angle at the top." I shall keep the bishop's hat in mind the next time I miter—nay, mitre!—a joint.

Wednesday, April 21, 2010

A Good Cycling Day... and Lots More Stuff for Sale

Today was one of my best all-round days as a cyclist. I woke up early and rode with Noah (of Velocolour) to the start of Mike Barry's (of Mariposa) weekly ride to Goodwood. It was a beautiful, warm, sunny day, and Noah and I had a good time challenging one another for the sprints for town signs. "Shop-partner" Olivier (of Cyclops) was along as well, and discovered that for fast group rides a big ring bigger than 46 can be very useful! (I was on my Santé-equipped Marinoni, which acquitted itself well among the carbon 10-speed bikes in the company.) With the ride to the start point and back, Noah and I had a 160km day.

After finishing the ride I headed in to the shop and finished my top tube miter. The TT miter is especially tricky since both ends are mitered, and since not only do the angles need to be just right, but the distance between them also needs to be spot on. I forgot to bring my camera in, but the above photo shows some of the leftovers of the process. The two short lengths of tubing are what I cut away from the ends of the TT. The butts on my Reynolds .8/.5/.8 top tube are even on both ends, so I cut off roughly the same from each side. The green tape is there to guide my rough cuts with the hacksaw—I'm still awful with a hacksaw. The v-shaped piece is a rough cut into the deep end of the miter. The white sheet is a printout from TubeNotcher+ that I followed with my file. I cut the printout along the miter line, stuck it on the tube, and traced the curve with a Sharpie. It's a good system. The two miters on the top tube appear to have been at the right angles, and well-spaced; the TT slid right in to the fixture. Or seemed to. We'll see how it all works once all the miters are finished.

My frame is really coming along now. I just need to miter the down tube at the bottom bracket shell (an easy miter) and I can start brazing.

I'm also selling lots of stuff in a continuing effort to finance all this framebuilding. I'm selling no fewer than 27 items on eBay. Follow this link to see 10-speed Chorus stuff, a Schmidt SON28 hub, lots of brake levers, some Campagnolo Triomphe stuff, some chainrings, some white World-Champion-striped SIDI shoes, etc., etc.

On Toronto Craigslist I've also listed my Gardin city bike, pictured at right. I put a tremendous amount of time and effort into this bike, and learned a lot from the process. But I don't ride it very much. As much as I like city bikes with swept-back bars, I prefer riding bikes with drop bars, and I find I rarely carry very heavy loads. In any case, I'm asking $1000 for it. If I can't sell it complete (which would be a shame!) I'll begin parting it out in a month or so. (Come to think of it, I could put those MA40 rims, Belleri bars, and Stronglight cranks to good use... Hmm!)

More updates soon!

Wednesday, April 14, 2010

Cut Out Ritchey Dropouts

The Ritchey vertical dropouts are extremely nice. But they tempt you to put a cutout into them. As you can see, I have yielded to temptation.


From the front they're flat and cutout-free. But the back has a "sunken" portion that suggests a cutout. A few weeks ago, during my first day in my shop, I started the cutout as follows.


This produced an unsightly excision in the otherwise beautiful Ritchey logo.


This problem was resolved by filling in the engraved portions with brass and filing them smooth. Here is what's left of "Hey."


So I am left with a slightly lighter, nicer looking, and rather unique dropout, which has also taught me some lessons.

Friday, April 9, 2010

"Investment Stamped" Lugs

Here is the first fruit of the fire I announced in my last post: "Investment Stamped" lugs.


I'm using stamped lugs on my first frame. They have nice long points, they're easy to work with, but they're not easy to use if you want to braze with silver. (Which I do: a practice crown done with brass yesterday reminded me why—it's hard, and things get hot!) 

The reason is that stamped lugs leave large gaps in the transition between the lugs. The usual thinking about silver is that it's very strong, but only when it's operating in narrow gaps. (I don't know if that's strictly true, but I don't want to test it!) Thus investment cast lugs, with tight transitions from tube to tube inside the lug (see these IC Cinellis), are a good match for silver brazing, because they leave no large gaps for the silver to fill. Stamped lugs, with their spacious transitions (see these Prugnats), are thus not a good match for silver.

Unless, of course, you're willing to spend two whole days filling in the gaps with brass and filing them in to shape. This is what I've done, and the results are above. Everything that's silver is steel and was part of the original stamped lug; everything that's gold is brass and was added. These transitions are every bit as tight as an IC lug, so they'll be fine for silver brazing. Plus all the filing was good practice.

Wednesday, April 7, 2010

Fire!

At long last, Olivier and I have made fire. There, at right, is what appears—through the sober lens of my camera—to be a shockingly hot flame. Shockingly hot is not a bad thing for us. If anything, we were afraid our oxy-propane (with oxygen from an oxygen concentrator) setup wouldn't be hot enough.

We really had no idea what sort of flame to work with, so we're going to research that a bit. In Doug Fattic's class I learned what to look for in an oxy-acetylene flame, but this one is totally different. For example, I could only find one cone: not the two distinct cones I'm used to in the oxy-acetylene flame. Hopefully this isn't because, for example, we're not getting enough pressure from our oxygen concentrator.

Our first brazing experiment was the one pictured at right: we just melted brass on a piece of scrap metal. Having succeeded in this, and dropped a big glob of brass onto the floor, where in shattered and hardened into numerous lovely brass balls, we moved on to project number two.

This related to my lugs. Since they're pressed, they leave big gaps at the transitions. For silver brazing, this just won't do. So we dumped a lot of brass in there. I'll file the sockets clean, and will be left with nice tight transitions, appropriate for silver brazing.


In other news, earlier today I carved my shapes into my bottom bracket and fork crown. The BB (from Ceeway) now has my "signature" lug shape in all the sockets. I also drilled holes on the sides of the seatstay sockets, to replicate the drilled-out spoons on the lugs. The BB doesn't look great in that photo, but you get the idea. The fork crown (a beautiful Pacenti Mitsugi) received similar treatment. The inside tang is like the point on my lugs; and viewed from the side, it has the same "double-swoop" profile. I think it looks great. I also filed off the reinforced area for a front brake bolt. This bike will get brazed on centrepulls.


Also, I got the rear derailleur for Bike Number Two today: a 1972 Huret Jubilee. I'll write a post soon about this planned second bike. For now, here is the lovely Jubilee screwed in to a Della Santa-branded Campagnolo dropout.

Saturday, April 3, 2010

The "A.HAMMOND" Lug Shape

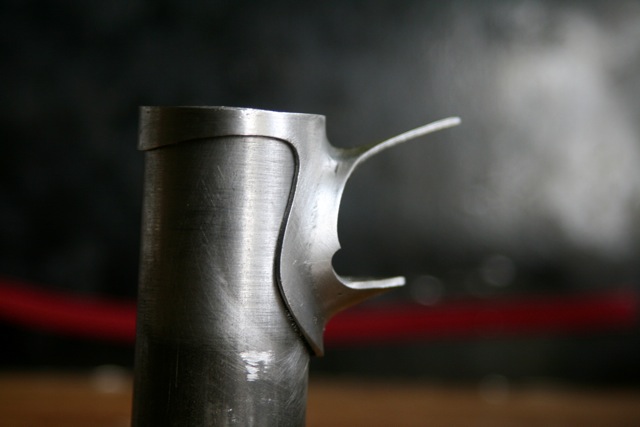
I've had a year and a half—the time since I finished Niles—to think about a "signature" lug shape. I've been carving it out (on the same two lugs) slowly over the last year or so. After many hours of filing and pondering, I present my lug shape:


This was carved out of a Prugnat "Type S" lug and now scarcely resembles the original. I got the idea for the shape around the headtube from the Prugnat 62bis shape (which my bike Briggs has) but wanted to make it simpler. After I'd more or less carved the shape into the lug, I saw this photo on Peter Weigle's incomparably beautiful and instructive Flickr site. That gave me the idea of carrying the curve further forward. In general mine is a bit less swoopy than his.


I like long points on the top of the lugs, so I left the Prugnats long, but thinned them out quite a bit. I spooned off the lower point for practical reasons (no can-opener effect with these lugs!) and also to make these as much as possible like Cinelli CS lugs (either Prugnat was copying them or they were copying Prugnat; they're almost identical.)

The second curve on the side of the lug—which the attentive will notice is new—is a nod to the Herse/Singer lug shape. But I didn't want to overwhelm the otherwise Italian look of the lug shape, and I didn't want to feel like a copycat or bandwagon jumper, so I made it as subtle as possible.

Here's the lower head lug:


Overall the shape is a hybrid of Cinelli-style Italian long points, French double-curve, and general Peter Weigle voluptuousness. I'm really happy with the way it looks. I think it will "fit" with racing bikes and randonneurs, and with slight modifications to touring and city bikes. And it should be very nice to braze with: very "lightweight," and with lots of well-placed swoops and cutouts close to the miters to be sure that the silver's where it should be.

Speaking of silver: since these are pressed lugs, the tube junctions leave big gaps that silver isn't equal to filling, so I'm going to have to add brass on the inside. This will take a lot of work—but that sort of fits with my general framebuilding ethos! I'll start on that once we've made some fire...

Now that I've got a lug shape I'm happy with (and I do need to straighten out some edges here and there on these particular lugs...) my next obsession is seatstay attachment styles. My main practical consideration is to do with centerpull braze-ons. All Mafacs except Raids want to be spaced at 62mm (enlarge the image at right, and bookmark this page—that image is a treasure-trove of useful information!) This is really narrow, and places the braze-ons precariously on the inside of the chainstay if you use normal seatstay caps. Peter Weigle's unbelievably elegant curved seatstay bridge exists not only because it's pretty, but also to reinforce the tenuously-placed Mafac bosses.

So I've been thinking of ways of narrowing the space between the stays where the centrepull bosses are brazed on. Fastbacks will set things too close together, and I don't think they fit aesthetically with a randonneur. So I'm thinking of doing a hand-miter that replicates the ingenious effect of the Cinelli plugs that Mariposa used: they're mitered to the side of the seatlug, so they pull the stays a bit closer together. (I prefer not to use the actual plugs for the aforementioned reason: I like to do things by hand if I can—and it will be lighter this way!)

The other option is to use Weinmann or Dia Compe 610 centrepulls. I don't like the way they look as much, but their bosses sit at 67mm from one another, which is a much more useful spacing, and better for fender clearance too.

(This was a pretty fun post to write, with lots of links to the people, bikes, and sites I like the most—Mariposa, Peter Weigle, Classic Rendezvous, VeloWorks, Bicycle Classics, Bicycle Quarterly, Prugnat, Cinelli, Alex Singer, René Herse, Mafac, Daniel Rebour, etc!)

Thursday, April 1, 2010

No Fire in the Shop, and In Praise of Santé

Today was supposed to be the day that we finally "made fire" in the shop. We'd had some tips and hoses backordered for several weeks, and they were all that were holding us up. They arrived this week, and we were so eager to try them out that we both took the day off work and headed to the shop.

Alas, the first thing we did was hook up our Craigslist-bought propane regulator, and when we turned the valve to switch it on—crack!—it broke. Clearly this thing was already broken. We did manage to successfully attach the oxygen concentrator (nickname: "The Ventriloquator") to our Victor J-28 torch, and it seems to provide more than enough pressure.

So we did some other things in the shop today. For example (and sorry for the ugly pictures: it's still dark in our shop, and I therefore need to use the—ugh—flash):

We drew center lines on my top tube, using our $975 retail value, $50 Kijiji Starrett height gauge.

And using our $30 made in China surface gauge, we set up the adjustable v-blocks on our Fattic design fixture. It's as flat as the drafting table it's sitting on, which is not saying much. Everything will be adjusted and aligned on the surface plate, of course.

Then we switched from my 5" Made in England Record vise to Olivier's 6" Made in England Record vise. There is clearly more than one inch of difference between the two. We got some soft jaws (a little too soft, if you ask me) and my vise didn't open wide enough to hold both a bottom bracket and the soft jaws. So we attached Olivier's larger vise, which he recently bought from the same guy that sold us the height gauge. This vise is, so put it mildly, massive.

It's a sort of "You call that a vise? This is a vise!" situation. It's so huge that it places work a little bit too high for our liking. It's also so huge that it can more or less support its own weight. But we clamped it anyway.

When I got home I did one of my favourite things: repacked a bottom bracket. Sometimes maintenance is pleasant, and this was an instance of that.

Partly because it's the loveliest cup-and-cone bottom bracket ever: the Shimano Santé BB-5000. No surprise, since Santé is one of the coolest (also kitschiest) groups ever. Those humourless "ShimaNO" types clearly have never ridden Santé, or repacked the BB and been met by its lovely and entirely unnecessary logo.

I also put some Challenge Parigi-Roubaix clinchers on my almost-entirely-Santé 1991 Marinoni Special. I'm going to take it for a ride tomorrow. It's a fabulously nice bike—one of two in my possession that I am going to keep in the coming I-Can-Build-Them-Myself-Now purge.